Windows 10 localhost/127.0.0.1 web certificate

I’m looking for a solution to fix/eliminate Chrome’s annoying “your connection is not secure” warning I receive when I launch Syncthing using my Windows 10 computer.

I have used OpenSSL to successfully correct this with self-signed certs by uploading the certs into some of my other UI apps. However, I just can’t find where I would load a self-signed cert into Syncthing.

I’ve read some of the other posts related to my issue, but they are related to Linux or just don’t answer this question effectively.

Thank you

Syncthing already installs a self-signed cert for its web server, so I don’t see a need to use a different one. Just tell your browser to trust the cert it’s already using.

Normally Chrome prompts and offers the option to set an exception…

Chrome.Your_connection_is_not_private.1of2

… where clicking the [Advanced] button continues to the next dialog box:

Clicking the “Proceed to 127.0.0.1 (unsafe)” link adds an exception that’s remembered as long as Chrome isn’t told to clear site data from the user profile.

Another option is to import Syncthing’s self-signed cert into Chrome. Dive into Chrome’s settings or jump there via the special URL chrome://settings/certificates.

Syncthing generates its own self-signed cert if one doesn’t already exist in its configuration folder, but if you want to replace it with your own cert, see the Syncthing Configuration page for details.

(The directions above apply to Linux, macOS and Windows.)

On Windows, the URL doesn’t exist. You need to import the certificate into the OS itself. However, I’ve tried doing that in the past and still couldn’t get around the security warning in the browser.

An alternative method is to enable the flag chrome://flags/#allow-insecure-localhost which allows to open localhost addresses without the warning.

1 Like

Bill,

I clicked on the red triangle with the exclamation and downloaded the cert after Syncthing loaded. Then I installed it in my Windows trusted root store but that didn’t work.

I believe it has something to do with the lack of precise SAN on the Syncthing cert. The reason my OpenSSL certs always work is because I place the precise FQDN and IP address in my certs.

Again, I’m trying to eliminate the Chrome waring and have the little black lock displayed.

Thank you

Yes, that’s right. Thanks for the reminder about the Windows version of Chrome. :slightly_smiling_face:

To get the little black lock indicator, you’d have to get Windows to trust your own root certificate, then use it to sign a new site certificate for Syncthing (this is the case for not just Chrome, but other web browsers too).

gadget,

I have my root-CA and intermediate-CA certs loaded into my Windows trusted root and intermediate stores, respectively. I use the intermediate cert to sign all CSRs that are generated by, and for, my various apps.

These apps include TrueNAS, Dell iDRAC, Cisoco WLC, VMware, Avocent KVM, etc. I created a SAN in the OpenSSL CNF that includes FQDN/IP address and use this CNF to generate a PEM cert or convert it to a CRT file depending on the app requirements. So the chain of trust is established when I load the server certs into the apps I just mentioned.

How do I get a Syncthing CSR to sign with my intermediate cert?

If you can already generate certificates that are accepted, simply provide them for Syncthing to use. The relevant files are https-cert.pem and https-key.pem in the configuration directory. Simply overwrite the existing ones with your own PEM files. Then restart Syncthing.

acolomb,

I’m using Windows 10 Pro and don’t see a configuration directory:

Thanks.

CSRs are generic, and arem’t required to be generated by the app that will use issued certificates. Since you already have OpenSSL installed, it can be used to generate the CSR for use with your local CA.

I’m not aware of a specific CLI or GUI function in Syncthing for generating a CSR. The majority of apps that use SSL/TLS certificates expect to be told what files to load for the certificates and private key, leaving it up to other tools to generate a CSR when not using a self-signed cert.

Syncthing’s documentation page “Syncthing Configuration” lists the default configuration location for Windows, macOS and Linux along with the filenames of the private key and certificate.

(Note that some Syncthing wrappers might place it elsewhere.)

gadget,

I agree with you.

However, when the app provides a CSR option I use it, because it helps to provide a tidy TLS package. In the case of Syncthing it looks like I will need to generate a key, use the key to generate the CSR, sign the CSR with my intermediate cert, and generate a Syncthing cert with SAN, etc.

The question I’m still waiting an answer to is where do I upload the key and cert to in Syncthing.

Excellent, I will take a look at the document. Thank you again for your help.

Sure, that’s completely understandable.

My personal preference is to manage all keys, CSRs and certs in one place, then deploy the keys and certs as needed. It’s especially handy when some apps want PEM format, Java apps want things in the Java keystore, etc.

For locally managed CA and generated certs, it’s not really an issue that some apps choose weak defaults when generating key pairs even when the crypto libraries they rely on support better choices. Using OpenSSL to handle all of the keys, CSRs, etc. helps mitigate much of that.

Hi everyone,

Quick follow up to let you know I got it working…see attached. Thank you again for helping me connect the dots and find what I needed to get the job done.

Cheers!

1 Like

PIC_1996

I went through the frustrations that you are going through now about a year ago. I eventually switched from the regular Google Chrome browser to the brave browser which is based on Google Chrome. it leaves me alone and is not bothersome. I make sure to use a password on each sync thing server and I always use SSH to connect from one server to another so the invalid certificate really doesn’t matter all that much because your connection over Ssh is secure.

ALSO, it’s important not to enable use HTTPS in the GUI. Turning that off is probably all you need to do. I don’t worry about encryption when accessing the management console on my local machine and when I access the management console on remote machines I always do it over a secure SSH tunnel so the HTTPS is really not a factor anymore.

Let me know if you need any assistance in configuring SSH client server for managing the console on a remote machine. It’s relatively easy to do in both windows and Linux although the documentation is a little sparse in this area. Hence the offer to assist.

It’s not easy to get windows and browsers to work properly with the certificates. Windows is inherently different from the way Linux handles things and each browser handles things differently as well.

I eventually decided that it was just not worth stressing out over and as i mentioned, I don’t get any pop-ups or warnings or anything annoying at all while using the brave browser. I also have use HTTPS disabled in GUI Settings.

Wank,

I accept your offer to help me configure Syncthing SSH.

Thank you

1 Like

OK,

I’ll begin with a brief set of instructions and then you can ask questions on individual pieces.

First, what OS’s are you running? Linux, Windows, or both?

For Windows, start by following these instructions to get Open SSH server instaled on Windows. How to install MS Windows SSH Server.

Basically, on Windows, go to the search box and type in “optional” It should give you the option to run “Settings” app and take you to Settings\Apps\Optional Features. This is where Open SSH Server is loaded from.

Other than doing the install, and setting the service to start automatically, there is only one other thing you need, and that’s a local user account to use for authentication.

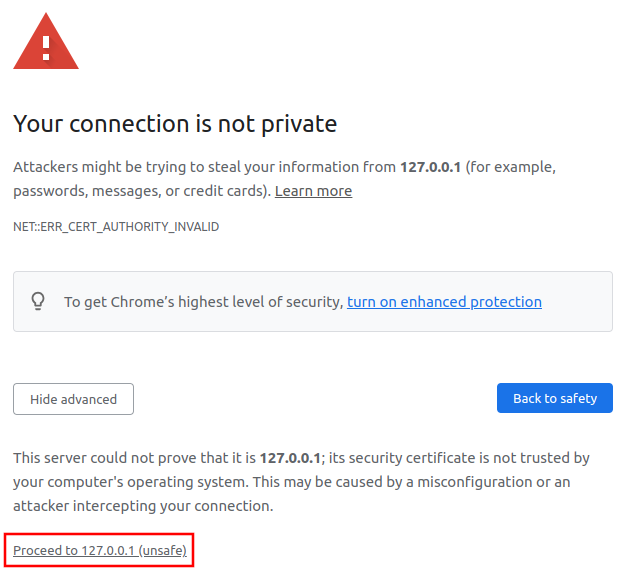
You don’t need to use/create and keys or certificates. You’ll be authentication with a user id/pswd. The very first time you try and log in you’ll get a warning message letting you know that the certificate on the server hasn’t been validated or something to that effect and you just need to type in the word yes and it will permanently add that certificate to the trusted list and you won’t be prompted with that anymore.

On Linux you install SSH Server with: sudo apt install openssh-server

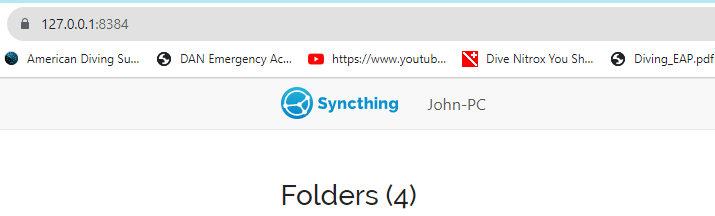
Syncthing GUI listens on port#8384, so here is the syntax for creating a secure SSH Tunnel from the client to the server. What you’ll be doing is redirecting a local port over the tunnel to the syncthing server.

On the client where you want to load the management console running on a completely different machine: (Do this in a Command Prompt window, NOT Powershell.)

ssh -L 6999:127.0.0.1:8384 user@syncthing-server

This command tells ssh client To open a secure tunnel. In this example it is redirecting local port 6999. You can choose a different one. The 127.0.0.1:8384 tells ssh server you want to talk to the local machine, and that you want to talk to what’s running on port 8384, which Happens to be the remote gui admin console.

The very first time you run this command you’ll get a message from the server saying that it doesn’t recognize the certificate. You need to type in the word yes, and then it won’t bother you anymore.

Then, you’ll be prompted for the password for the user you specified.

You should then get a terminal prompt in the home directory of the user that you logged in as. You can adjust this with command line options on ssh if you don’t want a terminal.

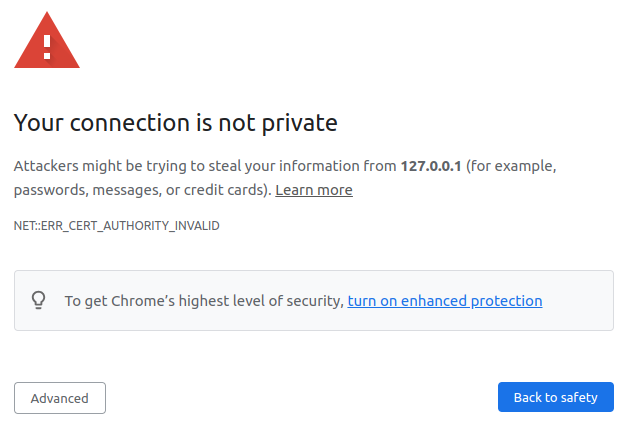
Then simply go to your local web browser and navigate to:127.0.0.1:6999

If all went well you should be prompted for your user id and password if you have one set up on the remote console.

The Ssh client syntax is the same on Linux.

See if this gets you going.

Let me know if I need to expand on anything in more detail.

Wank,

Excellent, thank you for going out your way, I appreciate it. I was able to launch OpenSSH with your the help of your instructions - this is great.

Thank you again.

1 Like